From extruders to electronics, 3D printers comprise an intricate symphony of components that bring digital designs to tangible reality. Each part plays a specific role in the additive manufacturing orchestra. Understanding these main components empowers users to unleash the full potential of 3D printing.
So let us embark on a journey into the inner workings to explore what gives life and precision to these modern manufacturing maestros!
Components List: Your Guide to 3D Printer Anatomy
- Extruder
- Hot End
- Print Bed
- Stepper Motors
- Power Supply Unit
- Rigid Frame
- Cooling Systems
- Filament
- Control Electronics
- Software and Firmware
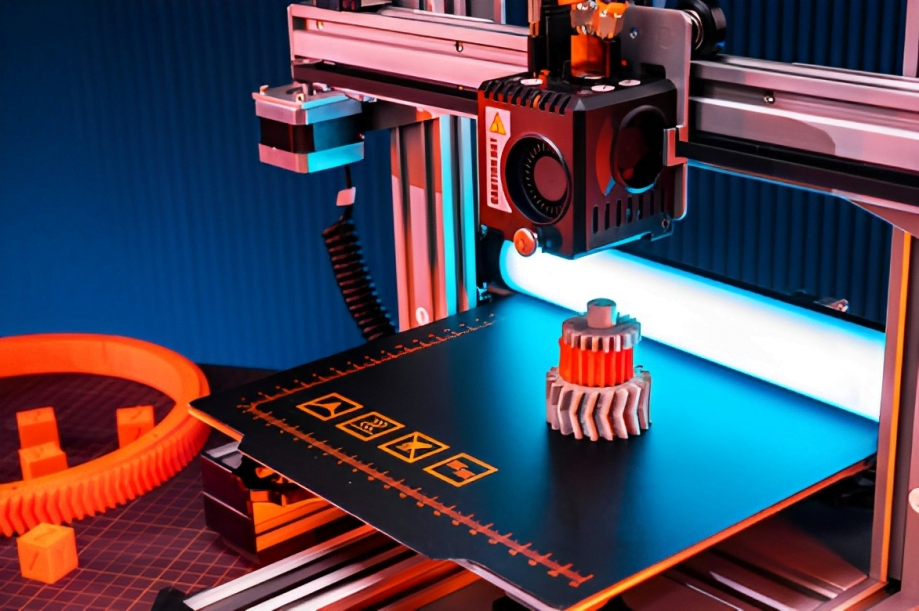
The Extruder
At the core of the 3D printing process stands the extruder, a key player in depositing material layer by layer to construct objects with precision. Dive into the innovation of direct and Bowden extruder systems.
Direct Extruder Systems
As the name suggests, direct extruders feature a nozzle positioned directly above the drive gear that pushes the filament. This offers a relatively straight path from input to output, enabling precise control and rapid reactions to retraction moves.
However, the print head on a direct system also has to carry the weight of the extruder components. This makes the assembly heavier, limiting print speeds and increasing strain on other motion components
Bowden Extruder
Bowden extruder systems separate the drive gear or feeder from the hot end nozzle with a flexible tube. This enables lightweight print heads for faster printing. However, the flexibility of the Bowden tube makes retractions and material pushes less precise.
Overall, Bowden setups work best for small, decorative prints while direct extruders handle large, high-strength components better. Hybrid systems seeking to get the best of both worlds are also growing in popularity.
Hot End
The hot end houses the business end of the extruder, where filament transforms into a molten material ready for deposition. It contains a heater block with a cartridge and thermistor to heat the nozzle to temperatures around 200°C.
As filament drives through the hot end, it liquefies right before being squeezed out of the nozzle onto the print bed. Nozzles come in varying sizes like 0.2mm, 0.4mm etc. to suit different applications. The bimetallic heat break ensures heat creeps upwards slowly, enabling consistent flow.
Hot end design factors in thermal dynamics, resistance, and consistency of extrusion flow – crucial for 3D printing success!
Print Bed
The print bed serves as the stage for converting the digital design into physical form. Just as a painter cannot create without the canvas, this build platform provides the foundation for the 3D printer’s creative potential.
Heated vs. Unheated
Heated print beds prevent downward curling due to rapid cooling and shrinkage of the deposited material. This ensures good first layer adhesion and mitigates material stresses. Unheated platforms suffice for materials like PLA but limit applications.
Materials and Coatings
Glass beds enable smooth first layers and easy print removal. However, inconsistent heating and potential fracturing makes them less popular. Aluminum plates conduct and retain heat well but need additional adhesion solutions. Other special coatings like PEI strike an optimal balance.
Leveling and Settings
Precision leveling establishes a perfectly uniform distance between nozzle and bed, enabling flawless bottom layers. Uneven beds result in poor adhesion or crashes. Thumbwheels, inductive/capacitive sensors, and automatic mesh bed leveling help achieve this crucial first step.
This unassuming platform bears the weight of realizing the magic of 3D printing through enabling the very first layer!
Stepper Motors – The Beat Behind Motion
Stepper motors drive movement to the symphonic tune of over 100 microsteps per rotation. These specialized actuators translate signals into incredibly precise motion. Understanding steppers helps optimize print moves!
Working Principle
Stepper motors consist of multiple toothed electromagnets arranged in a circular array called rotor and stator. By pulsing current through the coils in a sequential pattern, the rotor moves in distinct step angles dictated by the number of teeth.
Types and Properties
NEMA 17 motors are small, powerful systems well suited for 3D printers. Larger NEMA 23 variants handle bigger build volumes. Key factors are torque ratings, step angles (1.8° or 0.9°), motor drivers (voltage and current) and wired vs sensorless capability.
POwer supply unit- An Electrical Guardian
The often overlooked power supply unit and AC input provide the steady heartbeat that animates 3D printers. Evolving power systems continue enhancing reliability and efficiency.
Switching Things Up
Early 3D printers used simple but bulky linear power supplies. The advent of switched mode PSUs revolutionized systems through better energy density and outputs. These chop voltages at high frequencies to offer compact, quiet and highly efficient power conversion.
Getting the Voltage Right
Tuning voltage levels ensures optimum performance from motors, heaters, and electronics. 12-24V DC provides a sweet spot. AC inputs range from 110-240V, enabling global operation. Power couplers provide modular solutions for safer, uninterrupted power.
Power requirements varying between different models, it’s important to understand exactly how much electricity your 3D printer is consuming.
Rigid Frames – Providing Robust Support
The 3D printer frame forms the backbone keeping components locked in precise alignment for printing success. A rigid casing prevents vibrations while smart rail systems guide smooth head movements.
Importance of Stability
A sturdy frame minimizes shakes and displacements even at high speeds, preventing positioning errors such as layer shifts in prints. Stiff construction materials like aluminum extrusions or steel rods enable tuned rigidity.
Linear Rail Advantage
Precision ground steel shafts combined with rolling/sliding bearings greatly reduce friction while securing components. The integrated rail systems provide robust performance for the print head gantry and bed moving vertically/horizontally.
Cooling – Keeping Components Calm
Maintaining optimal temperature zones is crucial for 3D printer performance. Fans and heat sinks actively direct airflow to dispel heat from electronics and mechanical parts.
Why Heat Management is Vital
Stepper motors, drivers, microcontrollers, and power supplies heat up rapidly. Additionally, print head jamming and nozzle seeping demand immediate cooling. Efficient heat dissipation protects parts from overheating damage.
Types of Cooling Systems
Axial fans provide directed airflow across electronics and print materials during extrusion. Dual/multi-fan assemblies enhance heat removal. Fins or metal heat sinks conduct heat via convection. Some printers even use liquid cooling for ultra heat densities!
Importance of Balance
However, excessive cooling can also cause new issues like affecting material adhesion, rapid shrinkage and curling on vertical surfaces. Tuned cooling solutions aim for optimum component protection and print quality!
Filament – The Ink of 3D Printing
Just as the versatile colors on an artist’s palette, the wide variety of engineering and specialty filaments empower 3D printers with multifarious capabilities beyond simple PLA and ABS. Understanding filament properties allows exploiting materials to the fullest.
Properties Guide Capabilities
Rigid, robust ABS retains sharp edges versus flexible, elastic TPU suited for snap fits. Smooth PP and chemical resistant PETG enable range of applications. Wood and metal filled filaments expand aesthetic profiles. Every material brings specific strengths.
Optimizing Print Processing
Slicer settings align closely with filament properties for best printing results. Print/nozzle temperatures, retraction limits, part cooling, speed and fan settings hinge greatly on the loaded filament. Tuning these factors unlocks the full potential of materials.
Do not Underestimate the Filament
While electronics play key roles, the humble filament truly breathes life into 3D printed parts. Just as quality paintbrushes and canvas determine results for an artist, filament capabilities ultimately decide the creations possible with 3D printers.
Control Electronics – The Maestros of 3D Printing
The electronics command center, comprising of motherboards, microcontrollers and drivers, acts as the brains synchronizing critical printer mechanisms during manufacturing.
Motherboard
This printed circuit board is the heart of the electronics system, playing the role of the main conductor. It connects the power supply to the microcontroller, motor drivers, sensors, heaters, display units and more. Quality boards enhance 3D printing capabilities drastically.
Microcontrollers
Microcontrollers form the core processors executing instructions for the additive
manufacturing process. These integrated circuits decode GCODE from slicers, regulating steppers, temperatures, and motion. 32-bit chips like ARM Cortex M3 and M4 based STM32s bring processing muscle.
Optimized firmware and Marlin commands processed by the microcontroller cascade into immaculate prints. The brains behind the brawn of motors and frames undoubtedly drive 3D printer precision.
Motor Drivers
Motor drivers form the final gear translating instructions into physical actions. These electronic switches modulate power to the stepper motors by splitting voltage/current into controlled pulses.
From robust DRV8825, energy efficient TMC2208 and sensorless TMC 2209 variants, drivers are improving constantly. Auto-tuning smart drivers using Trinamic or other chopper-based solutions promise safer, quieter systems. They allow extraction of maximum torque from motors across speeds.
Closed loop feedback capable stepper drivers complete the critical electronics trinity orchestrating elegant movement fundamental to additive manufacturing.
Software and Firmware
Before any physical 3D printing occurs, specialized software digitally processes and slices models into printing-ready instructions. Printer firmware then relays these over USB or WiFi to command all electronic and mechanical components.
Slicers
Slicers form the software breathing virtual life into designs. Programs like Ultimaker Cura and PrusaSlicer analyze and slice 3D model geometry into layers while optimizing print motions and material usage.
Settings align closely with printer and material capabilities, modified based on needs. Advanced slicing handles complex shapes, controls infill patterns and density, auto-generates supports, etc. to ready designs for additive manufacturing. Powerful slicers can make or break print quality.
You can also download STL 3D printer files If you don’t have hours of work to design your own models or buy PreMade Models, making use of free 3D printer files saves time and money.
Firmware
Serving as the printer operating system, firmware manages communication between electronics and physical hardware. Open source systems like Marlin and Repetier contain modules for stepper control, temperature regulation, bed leveling, error handling and more.
Upgrading firmware unlocks faster prints, better supports and overall system upgrades. Paired with good slicers, calibrated firmware guides the manufacturing dance!
Finishing Up with Finesse – Post Processing
With components working in harmony, 3D printing transforms digital files into tangible objects. But removing supports, smoothing surfaces and applying protective coatings require additional post processing for professional grade finish.
Depowdering and Curing
Powder-based printers often need retrieval of objects from cake before sintering or curing under UV to set material properties. Thermal or chemical baths strengthen FDM prints. Dissolvable PVA makes support removal easier.
Surface Finishing
Sanding, drilling, scraping or metal brushing adjusts geometrical accuracy and ensures mating part fit. Primers fill microscopic crevices from layer prints before painting. Vapor smoothing liquefies top plastic layers for glossy finish.
Post Process – Maximize Return on Print Investment
Well tuned 3D printers produce quality prints, but finishing tasks upgrade objects to end-use products. Post processing completes the final mile for design conceptualization and enables truly functional prototyping or tooling creation via additive manufacturing.